...
- JIRA A (left in table)
- JIRA B (right in table)
Correct The correct configuration order is presented below. Some actions need to be done in sequence.
| JIRA A | JIRA B |
 Image Modified Image Modified
| Connection A setup |
| Expand |
|---|
|
- Go to JIRA Administration > Add-ons > ISSUE SYNC > Configuration
- Click +Add a connection button
- Fill the form with Name and Remote URL of JIRA B
 Image Modified Image Modified
- Click Create button
- Local Authentication Key has been generated for this connection
 Image Modified Image Modified
|
|
|  Image Modified Image Modified
| Connection B setup |
| Expand |
|---|
|
- Go to JIRA Administration > Add-ons > ISSUE SYNC > Configuration
- Click +Add a connection button
- Fill the form with Name, Remote URL of JIRA A and set Remote Authentication Key with Local Authentication Key from JIRA A
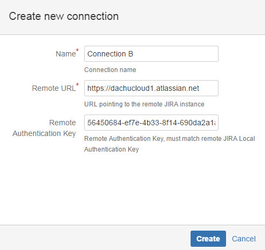 Image Modified Image Modified
- Click Create button
- Local Authentication Key has been generated for this connection
|
 Image Modified Image Modified
| Connection A setup - update |
expand- Click Edit link on Connection A
- Set Remote Authentication Key with Local Authentication Key from JIRA B
- Click Save button
Synchronization configuration (optional) |
| Expand |
|---|
|
To speed up configuration exchange between Jira instances: - Click Synchronize configuration link on Connection A
 Image Modified Image Modified
- Sync status of the connection changes to IN SYNC
 Image Modified Image Modified
|
|
 Image Modified Image Modified | Contract A setup |
| Expand |
|---|
title | Show...- Click Contracts tab
- Click +Add new contract link in Connection A section
 Image Modified Image Modified
 Image Modified Image Modified
- Click Save button
- Click +Create button in Create/Update triggers section
- Set Trigger name. Select Project Name and Issue type to determine issues synchronized from JIRA A
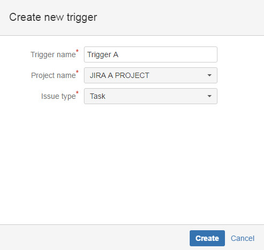 Image Modified Image Modified
Create trigger |
| Expand |
|---|
titleShow... | - Click +Create button in Create/Update triggers section
- Set Trigger name. Select Project Name and Issue type to determine issues synchronized from JIRA A
Image Modified
|
|
|  Image Modified Image Modified | Contract B setup |
| Expand |
|---|
title | Show...- Click Contracts tab
- Click +Add new contract link in Connection B section
- Set Contract name
 Image Modified Image Modified
- Click Save button
- Click +Add link in Remote Contract field
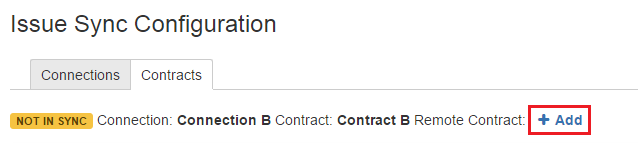 Image Modified Image Modified
- Select Contract A
- Click Incoming Configuration tab
- Click +Create button in Issue incoming mapping section
- Set Project Name and Issue Type to determine which issues will be synchronized. Select the trigger created in JIRA A in Remote triggers field
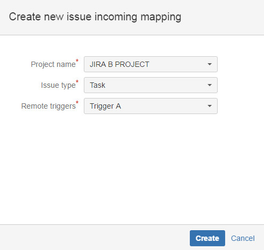 Image Modified Image Modified
Incoming mapping setup |
| Expand |
|---|
title | Show...- Click Incoming Configuration tab
- Click +Create button in Issue incoming mapping section
- Set Project Name and Issue Type to determine which issues will be synchronized. Select the trigger created in JIRA A in Remote triggers field
Image Modified Exposed fields configuration |
| Expand |
|---|
title | Show...- Click Edit button in Exposed fields to receive section
- Click +Add link
- Select Local field and set Exposed Field name (used in JIRA A as a label)
 Image Modified Image Modified
- Click +Add button
- Perform addition operation for every field, that should be exposed to JIRA A
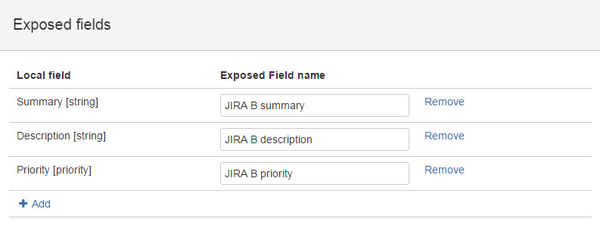 Image Modified Image Modified
|
 Image Modified Image Modified | Contract A & B binding- Click +Add link in Remote Contract field
- Select Contract A
|
|
 Image Modified Image Modified | Fields to send configuration |
| Expand |
|---|
title | Show...- Click Edit button in Fields to send section
- Click +Add link
- Select Local field and Remote Field name, that should be synchronized
 Image Modified Image Modified
- Click +Add button
- Perform addition operation for every field, that should be
|
send 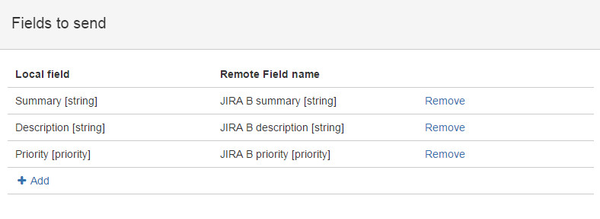 Image Modified Image Modified
Trigger Config |
| Expand |
|---|
title | Show...- Click +Add link in On which JIRA event trigger create field
- Select issue_created from the list
- Click +Add link in On which JIRA event trigger update field
- Select issue_updated from the list
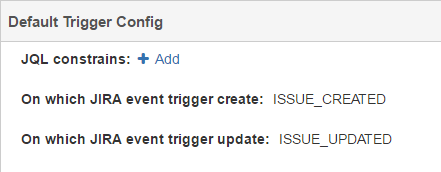 Image Modified Image Modified
|
|
 Image Modified Image Modified | Enable Contract- Click Contracts tab
- Click Enable link on Contract A
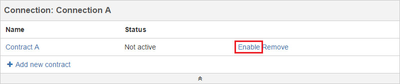 Image Modified Image Modified
| Enable Contract- Click Contracts tab
- Click Enable link on Contract B
|
Congratulations! Your setup is done.
...