TestFLO Automation for Test Execution
DEPRECATED APP: End of development and support
The functionality of this app became a part of TestFLO itself since TestFLO 8.0. and we have decided to pause our efforts in this area, so this app is no longer available on the Atlassian Marketplace. All development efforts related to automated tests will be focused on TestFLO. Please use the test automation integration present in TestFLO 8.x and higher instead. Customers who have TestFLO Automation for Test Execution will be supported until their license expires.
What is it?
TestFLO - Automation is a solution extending TestFLO - Core which allows you to:
- trigger the execution of your JUnit or Selenium tests on Bamboo or Jenkins automatically, by changing the status of your Test Plan (or another type that is currently the parent of your Test Cases)
- receive updates about the results of tests execution in Jira
It consists of two parts:
- a Jira plugin called TestFLO - Automation, that provides an API for creating issues in Jira out of JUnit or Selenium surefire-reports
- a JAR file which sends the test reports to Jira, executed by either by Bamboo or Jenkins when test execution finishes or simply manually from the command line
Important
You need to install the TestFLO Automation app from Atlassian Marketplace before you use the .JAR. Otherwise, the .JAR will not have the API in Jira to talk to.
Warning
TestFLO Automation supports Jenkins up to version 2.176.1.
How to use it?
You have to download this JAR file and execute it either from the console or through your continuous integration server providing a few parameters, as follows (this is the bare minimum):
java -jar testFLO-execution-result-sender-x.y.z-jar-with-dependencies.jar -v -u JIRA_BASEURL -l user -p user_password -pik PARENT_ISSUE_KEY -f surefire-reports
The full list of parameters you can use is described below.
| Parameter short and long name | Description |
|---|---|
| -bu,--buildUrl | URL to the build on your continuous integration server it will be placed in your resulting test cases for reference |
| -f,--file | Path to the generated xml files which are created by the CI server (example files: file1, file2). |
| -fa,--failAction | Jira TestCase workflow action name that transits from initial to the Fail status. "Auto-Fail" is used if nothing is specified. |
| -pa,--passAction | Jira TestCase workflow action name that transits from initial to the Pass status. "Auto-Pass" is used if nothing is specified. |
| -l,--login | Jira user login |
| -p,--password | Jira user password |
| -pik,--parentIssueKey | Jira Issue Key of the parent for the newly created issues. The parent issue needs to already exist in Jira, you need to create it earlier manually! |
| -u,--url | Jira URL |
| -v | Show configuration |
After the operation finishes successfully you will be able to view new or existing, updated issues in your Jira.
Exemplary execution:
java -jar testFLO-execution-result-sender-x.y.z-jar-with-dependencies.jar -v -u http://myjira.com/ -l testUser -p p@ssw0rd!2# -pik PRO-13 -f c:\testResults\ -bu http://mybuildserver.com/build123
Exemplary JUnit result files:
- TEST-com.intenso.jira.suitest.SuiTestSenderTest.xml
- TEST-com.intenso.jira.suitest.SenderCommandLineParserTest.xml
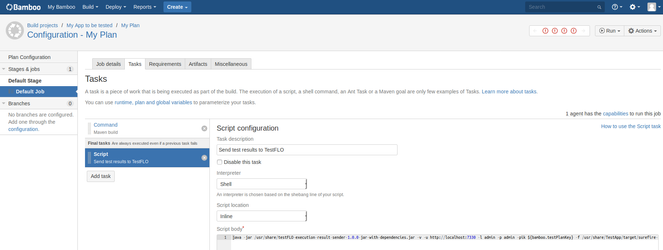
How to configure Bamboo for TestFLO Automation?
- Place the JAR on your server's filesystem and give the user that Bamboo runs as permissions to read the file.
Create a Script task and configure it as in the screen below (click to enlarge). The Script body should contain:
$JAVA_HOME/bin/java -jar {directory_containing_the_jar}/testFLO-execution-result-sender-x.y.z-jar-with-dependencies.jar -v -u {JIRA_URL} -l {JIRA_userName} -p {JIRA_password} -pik ${bamboo.testPlanKey} -f ${bamboo.build.working.directory}/target/surefire-reports -bu ${bamboo.buildResultsUrl}
You need to replace:
- {directory_containing_the_jar} with the path to the directory containing the JAR file
- {JIRA_URL}, {JIRA_userName} and {JIRA_password} are self-explanatory
Here is an example of this line with specific values:
java -jar /usr/share/testFLO-execution-result-sender-1.0.0-jar-with-dependencies.jar -v -u http://localhost:7330 -l robot -p p@ssword&^%!GFA -pik ${bamboo.testPlanKey} -f /usr/share/TestApp/target/surefire-reports/TEST-com.acme.testapp.CalculatorNGTest.xml -bu ${bamboo.buildResultsUrl}
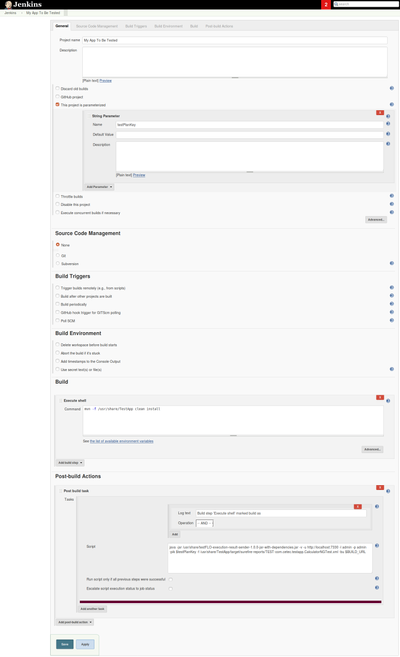
How to configure Jenkins for TestFLO Automation?
- Place the JAR on your server's filesystem and give the user that Jenkins runs as permissions to read the file.
- Create a Script task and configure it as in the screen below (click to enlarge). The Script body should contain:
$JAVA_HOME/bin/java -jar {directory_containing_the_jar}testFLO-execution-result-sender-x.y.z-jar-with-dependencies.jar -v -u {JIRA_URL} -l {JIRA_userName} -p {JIRA_password} -pik $testPlanKey -f $WORKSPACE/target/surefire-reports
You need to replace:- {directory_containing_the_jar} with the path to the directory containing the JAR file
- {JIRA_URL}, {JIRA_userName} and {JIRA_password} are self-explanatory
Be sure to check This build is parametrized and add a String parameter named testPlanKey.
 (Click the image to enlarge it)